|
|
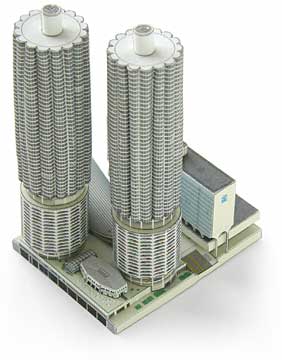 Marina City
 |

fig. 1 |
First cut out the small cylinders marked 'A'. Note a small black door on the cylinder which will indicate the bottom side of the piece. Glue the two small disks to the top of each cylinder (fig. 1). |
|

fig. 2 |
Next, cut out the cylinders marked 'B'. When putting together these short cylinders, take care to match the thin line on the "tail" end of the piece with the edge on the "head" end, to get a cylinder of perfect width.
Then, glue cylinder 'B' to the underside of the tower roof (fig. 2). Make sure the cylinder is precisely centered on the underside of the roof before the glue dries in place. |
|
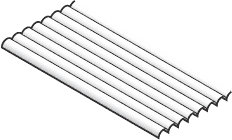
fig. 3
|
Before cutting out the walls of the towers, mark the valley fold lines and score on the reverse side of the card, as described on the Tips & Techniques page.
After you have scored the folds on the other side of the paper, you can cut out the walls.
To make the curves on the walls, bend the paper over a dowel or pencil, then gradually roll the paper tighter and tighter around a smaller dowel. After you have worked the paper into tight curls, you can crease the valley folds, then return to tightening the tiny curls.
This is the most challenging step of the model. It may take a while to fold and bend the paper into the shape pictured (fig. 3). You may want to use a tweezer as well as a coat hanger wire to gently pinch and bend the paper to get the curls even tighter. |
|
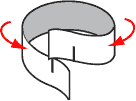
fig. 4 |
Cut out the white rectangle with notches at either end. Roll it around and lock the ends together (fig. 4). Do not use glue on this piece! This piece is used as a "belt" to hold the shape of the walls while the glue dries. |
|
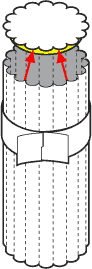
fig. 5 |
After you have worked the paper into a series of tight curls, glue the ends together into a cylinder.
Lock the "belt" from the last step around the walls to tighten the cylinder and glue the rooftop piece on top of the walls. The inside points of the walls should fit snugly against cylinder 'B'. Slide the belt up or down to hold in the curved walls and match the contours with the rounded edges of the rooftop piece (fig. 5).
After the glue has dried, you can unlock the "belt" and use it to build the next tower. |
 |
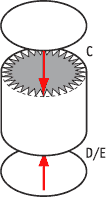
fig. 6 |
Cut out the cylinders for the car ramps. Glue the cap marked 'C' to the top, and the cap marked either 'D' or 'E' underneath (fig. 6). Look carefully at the pieces to line up the white columns on the car garage with the corresponding white posts on the caps. |
|
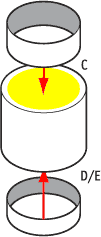
fig. 7 |
Roll the cylinders marked 'C' and 'D' or 'E' and glue them into place on the top and bottom of the car garage (fig. 7). Again, note the white pillars on each piece to match them up when gluing together. |
|
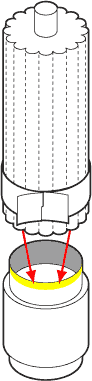
fig. 8 |
After the top of the towers and the car garages are dry and complete, you can connect them (fig. 8). Slide the top walls over the cylinder marked 'C' so that they overlap in just the shaded section. Once again, slide the "belt" down to keep the curled walls of the tower even against the inner cylinder.
Line up the pillars above (the creases) with the pillars below. Before the glue dries, check your tower to make sure both sections are straight and even.
When the tower is finished you can add the tiny cylinder at the top. |
 |
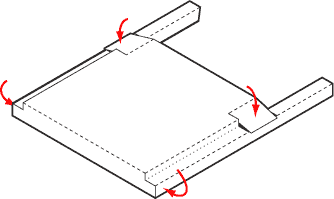
fig. 9 |
|
Next, cut out the base of Marina City. Fold the sides down and glue in place, then fold the driveways down at an angle (fig. 9). |
|
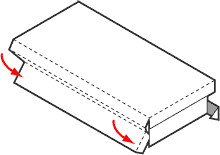
fig. 10 |
Then, cut out the base of the hotel. Fold the sides down and glue in place (fig. 10). Note that the building features both mountain and valley folds to create an overhanging roof with rows of windows underneath. |
|
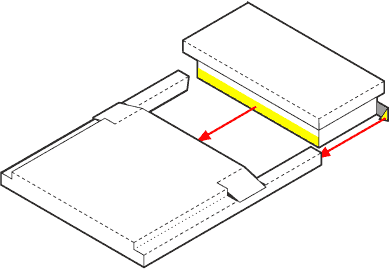
fig. 10 |
|
Now, slide the two sections of the base together (fig. 10). Tuck the triangular flaps seen in the diagram inside the first section of the base. Before the glue dries, make sure the two pieces sit squarely and evenly so that the rest of the model will be square and level. |
 |
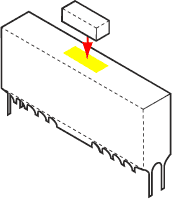
fig. 11 |
Cut out the upper level of the hotel. If you would like to simplify the model, you need not cut out each arch along the bottom. Also, you may want to strengthen the fragile longest arches with a drop of super-glue as explained on the Tips & Techniques page.
Finally, add the small mechanical house to the top of the hotel (fig. 11). |
|
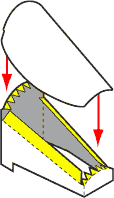
fig. 12 |
Cut out and assemble the four walls of the House of Blues theater. Then cut out and curl the oval-shaped rooftop piece to fit the rounded roofline of the building (fig. 12). |
|
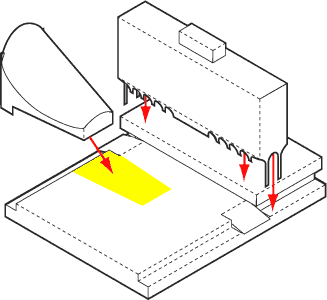
fig. 13 |
|
Glue the top the hotel atop the base. Look for small black squares on the roof of the base to match up with the arches on the bottom of the hotel. The long arches at each end extend to the lower part of the base (fig. 13).
Before you glue the theater in place, it may be wise to check the spacing between it and tower 'D'. You may need to adjust the curvature of the roof of the theater so that it does not touch the edge of the parking garage of tower 'D'. |
 |
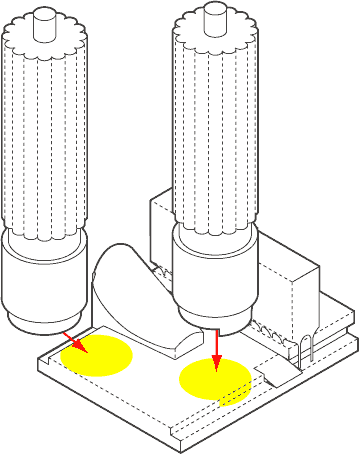
fig. 14 |
|
Once you have fitted the theater with enough space for the parking garage, glue tower 'D' in place and then tower 'E' (fig. 14). |
|
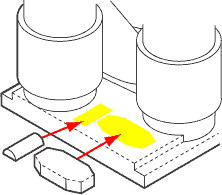
fig. 15 |
Finally, glue the tiny greenhouse and restaurant structures to their places on the Marina City base (fig. 15). Make sure the large doors on the side of the restuarant open out to the tables on the patio. |
And now your Marina City model is complete!
|