|
|
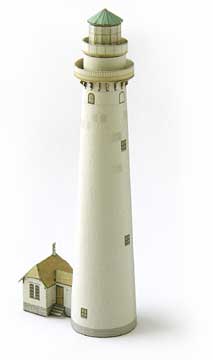 Grosse Point Light
 |
 |
Cut out the supply house, score the mountain and valley folds and fold the house into shape. Lastly, push the staircases outward. |
|
 |
Roll the tower into a tapering cylinder. You may want to use a round stick to curl the paper and to press the cylinder from the inside as the glue dries. When the cylinder is ready, attach the supply house to the base of the tower. Be sure to line up the botom edge of the house with the bottom edge of the tower. |
 |
 |
Now, attach the lighthouse top to the top of the tower. Glue the top so that the door on the middle section of the top lines up with the supply house at the base of the tower. |
|
 |
If you would like to add small details to your lighthouse, cut out the tiny brackets and glue them in place at the top of the tower section. You may want to color the edges and back of the pieces with a marker or colored pencil to match the front of the bracket. |
|
 |
Cut out the supply house roofs. Fold the larger roof and glue the hipped roof together, then glue it in place on top of the house. Note that the notched side of the roof fits over the passageway connecting to the base of the tower. After the larger roof is in place, glue the smaller roof between the supply house and tower. |
|
|
Finally, if you would like to add another small detail, cut out the tiny chimmney. Fold it over on itself and bend a little bit of the bottom part of the chimmney outward to glue it to the roof. There is a small white square on the left side of the roof which shows where the chimmney should be connected. |
And now your Grosse Point Lighthouse model is complete!
If you'd like an added challenge, add railings and clear windows to your lighthouse model on the Extra Projects page.
|