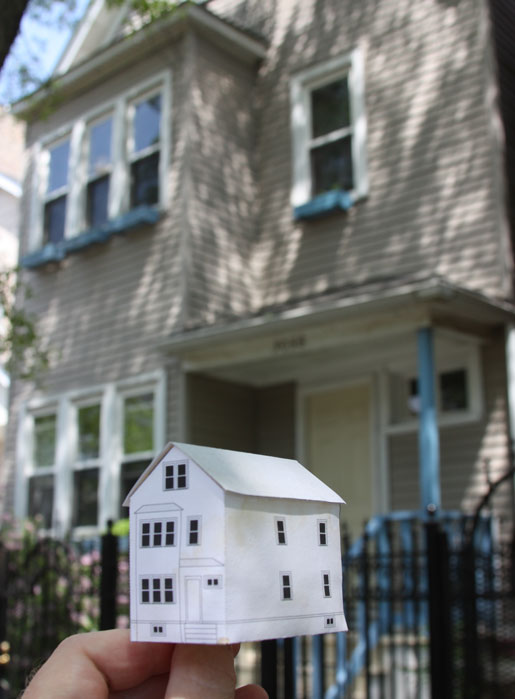
Make a Paper Model of Your House
While designing a model of your house you'll need to decide on the scale of the model. The scale may depend on how large you'd like the finished house model to be, or whether you'd like the model to fit in with other miniature objects or be placed in a scene such as a model railroad layout.
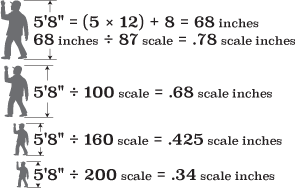
To find out the scaled-down size of any object, simply divide the measurement by the scale. Don't forget to convert any measurements in feet to inches before scaling down. If you are using the metric system, the conversion will be easier!
Measuring Your House
Start by measuring the width and length of your house at ground level with a tape measure. Unless you can go up on the roof and lower the tape measure to the ground, measuring the height will be more challenging, but its possible to estimate the height from photos.
Find a spot where you can photograph each wall of your house at a straight-on angle. The image will have less distortion if you are able to stand far away and use a telephoto lens. It may be a challenge to get a good photo if there are trees or other objects in the way, but if the photo shows a portion of the height and width that will be enough to make a rough estimate of the dimensions of the house.
You can correct any distortion and straighten the walls in a photo-editing program, or just place the images into a drawing program to make a rough estimate of the building height.
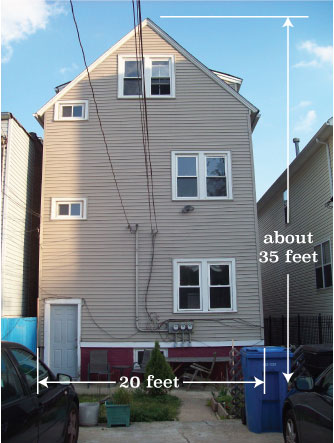
At 1:87 scale, the 20-foot width of the house will be scaled down to 2.759 inches.

Resize the image in the drawing program so that the wall of the house is the correct scaled-down width. Then draw a rectangle to measure the height of the building on the resized image in comparison to the width.
If you are not able to determine the length and width of the house with a tape measure, you can get a rough estimate of these dimensions from aerial photos. Google Earth includes a measuring tool which can measure distances on the rooftops. Note that some roofs include eaves which extend beyond the walls of the building which may hide the actual width of the walls.

Flatten the Box
The width, length and height measurements will allow you to make a simple box model of your house. Draw rectangles for the four walls to the sizes of the scaled-down dimensions. Copy your house photos to place the windows and doors in the right places on the wall pieces. Draw tabs extending from the corners where the pieces will be glued or taped together.
Before filling in too many details of the walls, you can print a test copy to make sure that the pieces fit together correctly.

Your house model may be a simple rectangular box shape, or it may be made from several connected boxes representing porches, attached garages or side additions. You can add as much or as little detail from the real house as you like.
Rooftop Zigzags
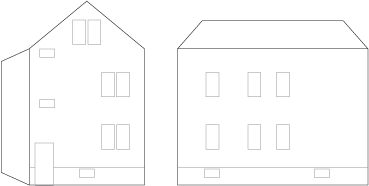
When the shapes are rectangular it is not so difficult to figure out the dimensions of the paper pieces. But what about angled roof pieces? How wide does a roof piece need to be to cover the rooftop correctly? To figure that out, draw a precise diagram, or elevation, of the end view of the house. If there are roof eaves that overhang the walls, include those as well.
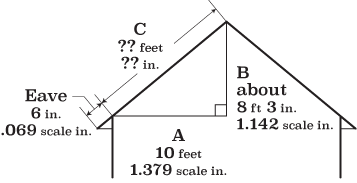
The length of the roof piece "C", or hypotenuse of the large triangle, can be figured out using the Pythagorean Theorem.
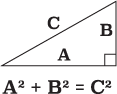
Measuring from the photo above, "A" is half the width of the house, or 10 feet. "B" is about 8 feet 3 inches. Convert the dimensions to the scaled-down size and then calculate the square root of the total.

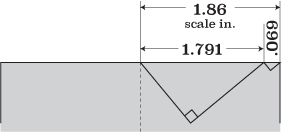
A simple gable roof can be made by a rectangle-shaped piece folded in half. Draw each side of the roof to the width "C" plus the length of the eaves.
If you don't want to fuss with the calculations, you can graphically measure using the triangles from the elevation diagram made in the first step. Rotate the triangles so that the hypotenuse or length of the roof is horizontal or vertical then draw the roof piece width to the same size.
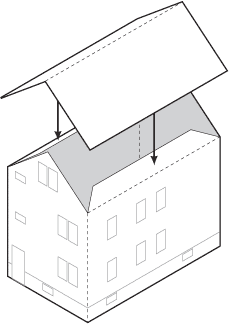
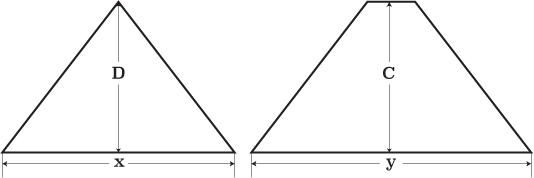
A hipped roof is more challenging to design. To figure out the sizes of the roof pieces, draw elevation diagrams as above for the end and side views of the house.
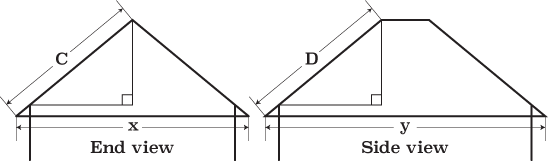
Figure out the length of the hypotenuse dimensions "C" and "D" as you did previously. Depending on the angles of the roof these may or may not be the same in the end and side elevation views. In this diagram, the roof eaves extend beyond the walls slightly.
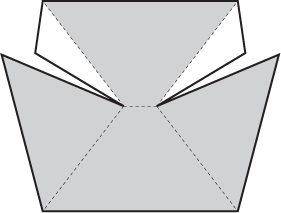
Copy the roof shapes from the elevation diagrams and stretch the shapes vertically to the lengths of "C" and "D". Note that the end view shows the length of the side roof piece, and the side view shows the length of the end roof piece.
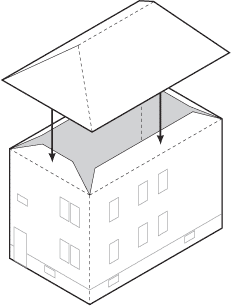
Rotate the roof shapes to connect at the corners and sides to make a larger roof piece that can be folded along dotted lines. A complex roof may require separating the shapes into two or more connected roof pieces. Add tabs where the roof will fold under or attach to another piece.
Print and test-assemble the roof to make sure it fits together correctly.
That's So Meta
After you finish the paper model of your house, why not add a scaled-down version of yourself inside? Perhaps even a scaled-down you holding your scaled-down house! Print a photo of yourself reduced to the correct scale size. Cut it out and glue it inside a window or door of the mini house to surprise the giants who might peek inside.